 |
| My son, Colin on Feb. 2, 2011 |
The background paper I used for this one is from an old My Mind's Eye collection, Holly Jolly. The die cuts were made from various Basic Grey plain papers and Holiday Sentiments paper from the Tradition collection by Fancy Pants Designs.
 |
| MME - Holly Jolly - Candy Canes |
|
 |
| Fancy Pants Designs - Tradition - Holiday Sentiments |
|
These are the dies I used:
 |
| Spellbinders - Locking Loops |
|
 |
| Spellbinders - Romantic Rectangles 2 |
|
 |
| Spellbinders - Marvelous Squares |
|
 |
| Spellbinders - Captivating Squares |
|
 |
| Spellbinders - Postage Stamps |
|
 |
Spellbinders - Large Deckled
Mega Rectangles |
|
 |
Spellbinders - Small Deckled
Mega Rectangles |
|
These are the chipboard pieces I used:
 |
| 2Crafty - Cartia's Swirl |
|
 |
| Dusty Attic - Snowflakes |
|
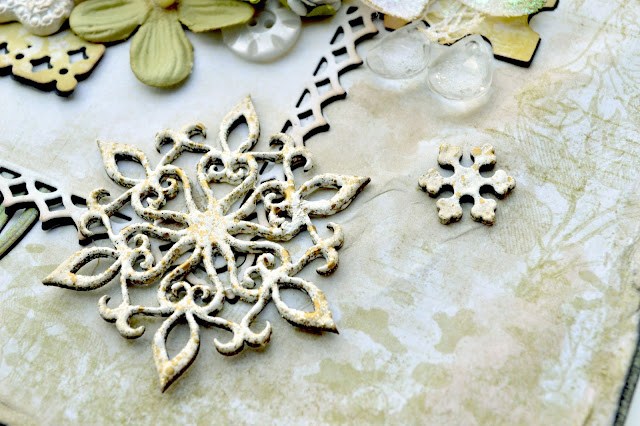
The large snowflake doily was cut from very thin chipboard using a Cricut and the Close to My Heart Art Philosophy cartridge. I heat-embossed all of the chipboard pieces with Stampendous Fran-tage embossing enamel in Shabby White. Sometimes I paint the chipboard first but this time I just used clear ink on the bare chipboard before sprinkling with the embossing powder and melting it with a heat gun.
I'm not sure why the snowflake doily doesn't look as sparkly as the other pieces. I cut and embossed that piece quite a while ago but hadn't used it yet so it's possible I might have done something different that I don't remember (perhaps I added some Chunky White embossing enamel too). It could also be that the different sized granules had settled in the container and more of the gold sparkles had concentrated near the top now.
The little green mittens and the circles border were made with Sculpey clay using a mold and then painted.
 |
| Best Flexible Molds - Let it Snow |
| 
|
 |
Lisa Pavelka mold -
Daisy Chain Border |
|
Around the outer edge of the background paper, the snowflakes and some of the crystal pieces, I did some subtle watercolour shading.
I don't often mention this because it seems a minor detail to me but you can take it as a given that I ink around the edges of the paper and die-cuts in almost every layout I do. I often do that with the flowers as well, or dry brush them with paint to highlight the texture.
Thank you for taking a look today!


Oh MY! I always LOVE viewing your layouts on your blog because that is where the tiniest details are seen up close and explained. WOW! Your artist abilities really blow me away...always love the clay pieces! I love how perfectly the colors match the photo colors, the arrangement of the different die cuts and the angled photo. Everything is fabulous!
ReplyDeleteone more thing - well a few more (LOL)....your attention to details is truly remarkable! Those little puff balls (snow balls) and the crystals (icicles)...I'm astonished. :)
ReplyDeleteYour Sculpey clay pieces are always the perfect little touch that adds so very much to the clusters - those mittens are adorable! I love how you have managed to make the whole piece look "softly frosty", another amazing artistic feat!!
ReplyDeleteYour Sculpey clay pieces are always the perfect little touch that adds so very much to the clusters - those mittens are adorable! I love how you have managed to make the whole piece look "softly frosty", another amazing artistic feat!!
ReplyDelete